Showing posts with label ideas. Show all posts

Thursday, June 6, 2013

How to make a Succulent Terrarium

Steps in make your own beautiful succulent terrarium

It's easy peasy! I've laid it out with pictures, but it's pretty easy. I love terrariums, and my mom teases me saying they're nothing new and I wasn't around in the 70s, but hey I wish I would have been. I'll be posting more terrariums later as we get them made in the store, but I would love to see some of yours!

Supplies you'll need:

*Glass container- be creative and different, it's not just the plants that make a terrarium beautiful, but the container they are placed in. And note that for terrariums with succulents, you can not use containers with lids.


*sheet moss- found in flower shops and other craft stores
*river rocks or gravel
*activated carbon (aka activated charcoal)
*cactus and succulent dirt- it drains better

*Cacti and succulents- choose a variety of colors, textures, shape for leaves. You want you terrarium to be interesting so use plants that you like. And remember that you need to plant like plants together. Only plant succulent and cacti in the same container, and never plant succulents with other plants because in the end the odd man out will not survive. 

*Accent pieces- this is where you are only limited to your imagination. In the picture below starting with the box and going clockwise you have orange dyed reindeer moss, lotus pods, lime green dyed reindeer moss, faux moss covered rocks, orange deco rocks, and orange sand. Other ideas are drift wood, small signs, rocks or sea shells you find, and anything else you want, make it your own.


How to make a succulent terrarium:

1. First get your container and make sure it's clean. Don't use harsh chemicals though to clean it, it could harm your plants later.


 2. Next layer the sheet moss on the bottom of the container. This is going to be where the water will accumulate if you over water your succulents. 

3. Then, cover the bottom of the container with river rocks or gravel. This will serve as a filter to keep the water away from your plants' roots.
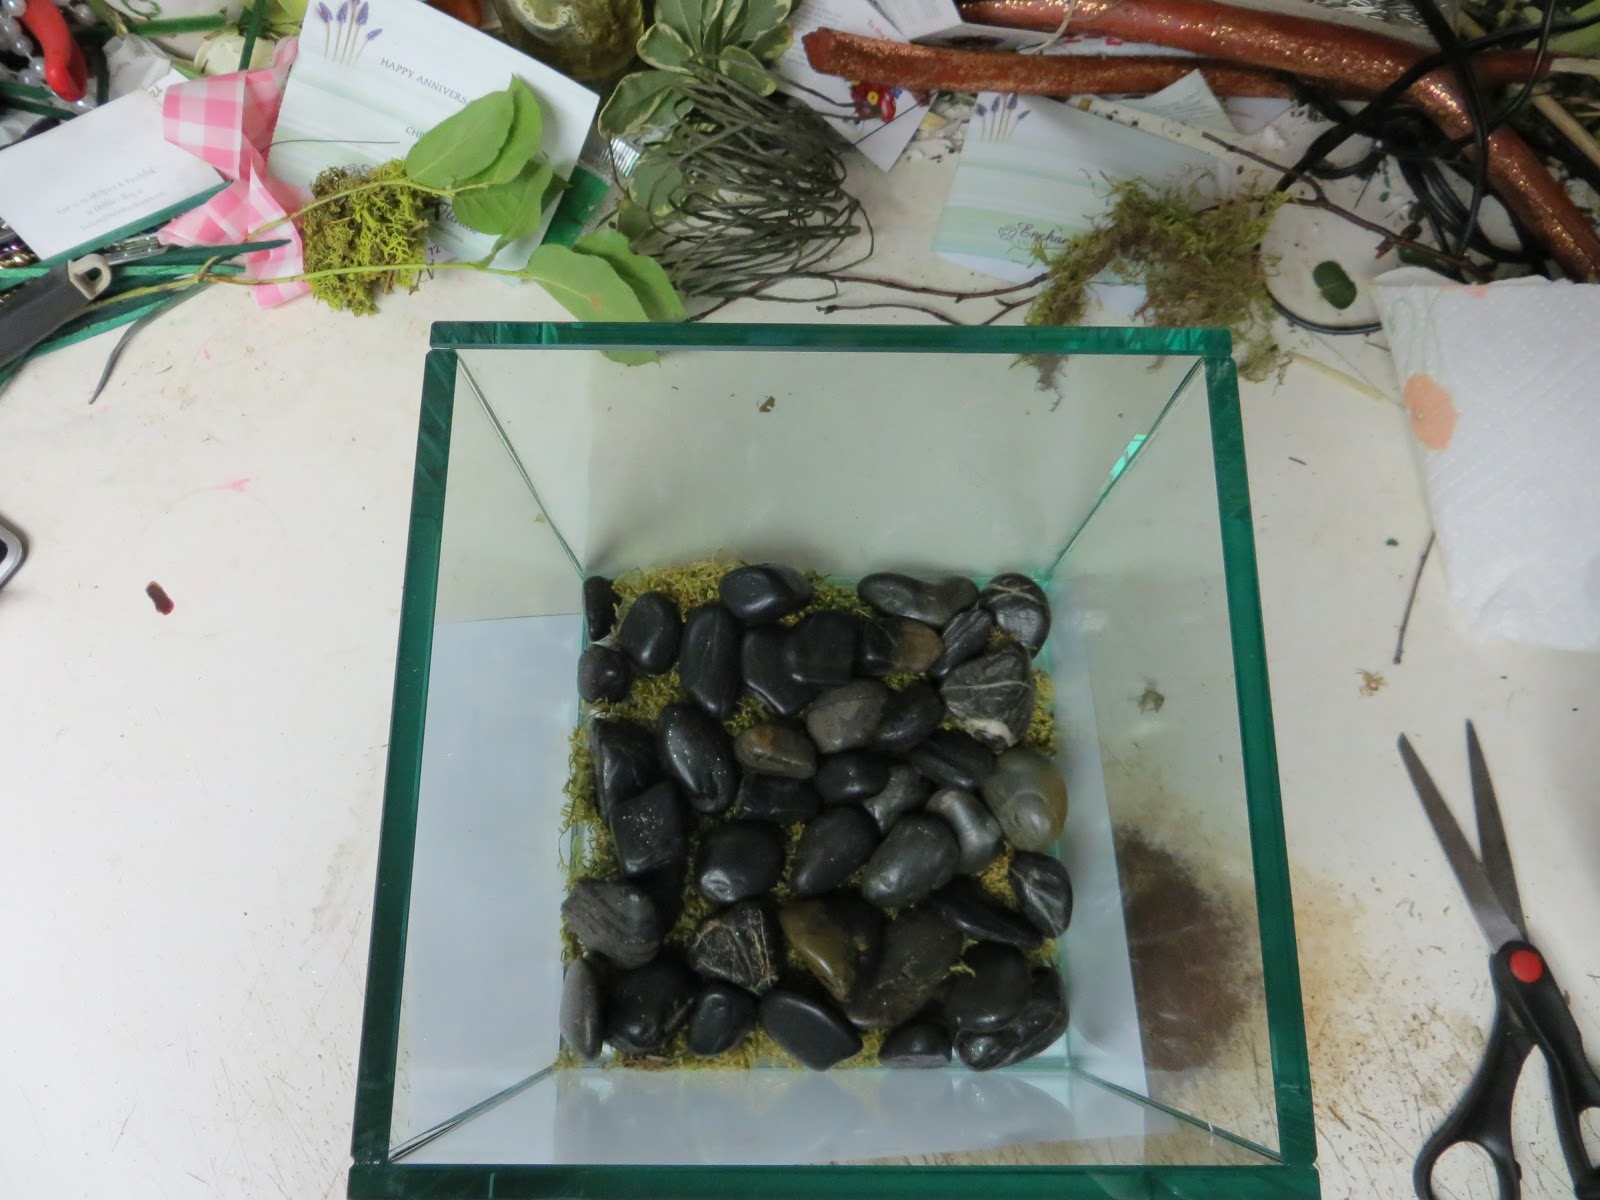
4. Then sprinkle the activated carbon over the rocks. In this container, about 12" x 12", I used 3 handfuls over the river rocks. The activated carbon will help absorb water, odors, and colors from the terrarium. It is not a mandatory step, but will help with the longevity of your terrarium.

5. Next place another layer of sheet moss over the activated charcoal and rocks. This layer of moss will prevent the soil from seeping through and compacting over the life of your terrarium.

6. Last step of prepping is to add the dirt. You want to add at least 2" of dirt to give you plenty of room to plant your succulents. You can add more depending on the height of your container.

7. Finally the fun part. Plant your plants in the dirt, using an odd number of plants is usually better, but I only had 4 different types on hand. Think of where you want to keep your terrarium. If you will be viewing you terrarium from all sides, rotate your container around while planting to make sure you like the view from all angles. Then once the plants are in, add any accent pieces you want. And ta-da!!

Finished product- here is the front of the finished container. It turned out so pretty and I like the layer of moss showing to, it adds character. 

I hope you have fun creating your terrarium, I sure did. I can't wait to  make more. I love getting to create things to add to our website and sell to our customers. And if you have any questions or comments, I would love to hear from you.

Tarrah @
Enchanted Florist

Visit us on Pinterest


Monday, April 29, 2013

Your Wedding Guests Will Flip for These Flops

Wedding Favor Trend - Flip Flop Baskets


I recently attended a fabulous wedding, and yes we did the flowers too so I knew exactly how long the Bride intended for the wedding to last. She wanted guests partying until the wee hours and having a blast and that is exactly what we all did. And I was amazed and thankful that about half way through the wedding, after the cake, toasts and when the good dance music started, servers came around with trays full of flip flops for the guests.

In my opinion, that was a very thoughtful idea for the guests and I noticed that everyone on the dance floor had a pair on. Each pair was monnogrammed with couple's name and wedding date, in cute bags with the sizes on them, and in the wedding colors.

So  I started to scour the internet and saw that this trend is picking up some popularity. Of course I came across some brides who thought this idea was just ridiculous and thought it tacky to see guests in flip flops. Well to them I say women will take off their shoes reguardless, so why not provide a cute, safe way for them to enjoy your wedding. So many times at weddings when dancing is getting good, glass is broken and drinks are spilled. Safety first people! And well they're cute too!

At the wedding I attended, her flip flops were custom so I found a place online that would do just that. They have some cute ones to choose from, so go check our Party Flops if you want to go that route.


Custom Wedding Flip Flops
 I also read where brides were wanting to provide them for the guest but more on a DIY budget, so it's up to you and how much effort/money you want to put in. Here's a couple of DIY flip flop baskets, they are so cute and I love the details you can include when it's a do it your self with love project.

Don't for get to label the sizes

Flip Flop basket by Laurie
A Cute DIY

Flip Flop Wedding Favor Tips / Hints


I learned a lot from brides posting how their flip flops baskets went over at their own weddings. I love how brides are so quick to share and help each other.

First, don't forget about them and make sure they get used. Don't put them in the bathroom or out as they are leaving so nobody knows about them. My suggestion would be right on the dance floor, or a table near the dance floor just for the baskets.

Second, label the sizes. Don't make your guests dig through baskets and baskets just to find a pair that fit. I read where one bride even color coated the sizes, smalls were one colors, mediums the next color and so on. If you're having a couple of baskets, label the baskets too.

And lastly, the sizes. Most brides commented that if they had any left, it was the smal sizes only. As far as how many of each size, this is what was about average and how they figured how many to buy. Generally, your guest will be 50/50 men a women. So take your number of guests and divide it by two, then multiply by 2/3. So about 2/3 of you female guest will change shoes.

For example: 300 guests
300/2 = 150  150 x 2/3 = 100

Then breaking down the sizes, this is what was average for the brides who posted what they bought. (in percentages %)

 Size 6 - 5%
Size 7 - 30%
Size 8 - 35%
Size 9 - 20%
Size 10 - 5%
Size 11 - 5%

So back to our example of 300 guests, buying 100 pairs.

Size 6 - 5 pair
Size 7 - 30 pair 
Size 8 - 35 pair
Size 9 - 20 pair
Size 10 - 5 pair
Size 11 - 5 pair
  
Remeber, that guests can always wear a bigger size if you run out of their size, but they can not wear a smaller size. And you know your guests, if more of them are tall, buy more bigger shoes, if more of them are short, buy more smaller shoes.

Many of the DIY brides either bought their flip flops at Old Navy when they have the big sale, Michaels, or the Dollar Tree. So this doesn't have to be a bank breaker option, just your time and creativity. Beware though, if ordereing from the Dollar Tree, flip flops are mixed colors.

I hope this helps some brides. I've either given you a great idea, or at least some of the work for you. 

As always, let me know if you have any questions, comments, or concerns. 

Happy Flip Flop Shopping,
Tarrah


Visit on Pinterest and Facebook too


Thursday, December 20, 2012

How to make a Snowman Christmas tree

Create your very own Snowman Family

One of our companies has an annual Christmas party that we love to do because we get to step away from the red and gold monotony of most Christmas decorations and get creative.  This year's party's theme was classic black, white, and silver  and there's rumors that next year will be purple. Each year they get a show stopping piece that employees usually use to take pictures besides. One of the showcase pieces this year though was the snowman family. 


When creating a snowman, women, or the whole family like I did here I think less is more, so no major decorations were used on the snowmen other than the accessories. The snowman was a 7 1/2' white tree, the woman was a 6 1/2' white tree, and the baby was a 4' tree. Since we dont usually use white trees in home decor, I bought cheaper tree. If its something you'll use often, I would spend a little more and get a quality tree. 

Now for the party we were on a limited time schedule (the whole party is set up in about 3 hours) so I didn't get to finish out the trees like I would have wanted to, but with enough time I would have liked to shape the trees into round spheres for the body. The choice is yours on shaping.


Gather your items you'll need:

*a white or flocked Christmas tree (any size)
*head for your snowman- we found our heads at Big Lots
*arms- for the snowman I used silver ting ting because they were long, just keep in mind you need something proportional to your tree

*Hat- For the snowman we found a tall top hat at a discount store. For the snowwoman we used a vintage hat that belonged to my great grandmother, and then added a little bling to it. For the baby we used the hat that came with the head.


*Button- for the buttons on all of them I just used solid black Christmas ornaments. The ones on the snowman were 150mm. The snow women and the baby's were 120mm.
*Scarfs- for the 2 big ones I used a strip of the fabric (see below) and on the womans I layered a black & white feather boa on top of it. For the baby I used a black sheer table runner. 


Now What....

1. So first shape the tree into spheres if desired (I omitted this step)
2. Add buttons
3. Add the arms. I secured my arms by wrapping tree branches around the arms for stability.
4. Add the scarfs. Do this before the head so you can get them tucked up under there. 
5. Place the head on top. If you can't find a pre-made here like we did, you can make your own. Try using one of the hard plastic orange pumpkins used for trick or treating. Paint it white and add your face.
6. Place hat on head, you may need to attach to head before placing head but it will depend on what you're using.
7. Finish it off. To finish for the party I spread out cotton batting to get that snow like appearance and added some silver ornaments and silver glitter floral pieces for some glitz.

When planning you snowman and/or family, pick a theme and run with it. Do you like a rustic/country Christmas?? Use burlap accents and try adding boots under the tree for legs. Add in a cowboy hat and you have yourself a country snowman.

I hope everyone has fun time creating your snowman. And here are a few other pictures from the party that day. 
Tarrah

Entry piece it was the companies 25th Anniversary

One of the arrangements on a bar high table

Our rental manzanita trees, in the urns they are over 7' tall

Our iron trees with lights and flowers added, they are 5'


Wednesday, August 22, 2012

Follow un on Pinterest!

Do you pine to pin???

Are you one of the millions of people who have recently joined Pinterest? Well so have we and we're obsessed! Follow us at  Enchanted's Pinterest and be inspired. We will be posting some of the more fascinting things we have the privlidge of making for our wonderful customers, along with wedding pictures and ideas and anything else we find interesting. We look forward to following you back to see what you're up to. And find this creative and unique arrangement on our Fun Flowers board.

Also to appear, custom prom corsages, unique prom boutonnieres,
homecoming mums, and even personal sympathy flowers.
And as always, you can visit our website at
so purchase flowers and plants to be delivered around the world.

I hope to see you soon! Tarrah